What to Know Before Using an Ultrasonic Cleaner for Silver Jewelry
Thinking about using an ultrasonic cleaner for your silver treasures? It's a game-changer for grime, but there are a few crucial things you absolutely need to know to keep your pieces safe and shining.
Oh, the allure of sparkling silver! There’s nothing quite like that brilliant gleam, is there? But let's be honest, keeping our favorite silver jewelry looking its best can feel like a never-ending battle against tarnish and everyday grime. For years, I relied on polishing cloths and a bit of elbow grease, which worked, but never quite reached those intricate nooks and crannies. That's when I started hearing whispers about ultrasonic cleaners – these magical little machines that promise to do all the hard work for you.
I was intrigued, to say the least. The idea of dropping my dull pieces into a bath and having them emerge sparkling clean felt like something out of a sci-fi movie. But before diving headfirst into the world of ultrasonic ownership, I realized there was a lot to learn. It turns out, while these devices are fantastic for many types of jewelry, silver has its own set of rules. So, if you're like me, standing on the brink of ultrasonic ownership or just curious about making the most of yours, let's chat about what you absolutely need to know to keep your silver safe and stunning.
The Magic Behind the Bubbles: How Ultrasonic Cleaners Work
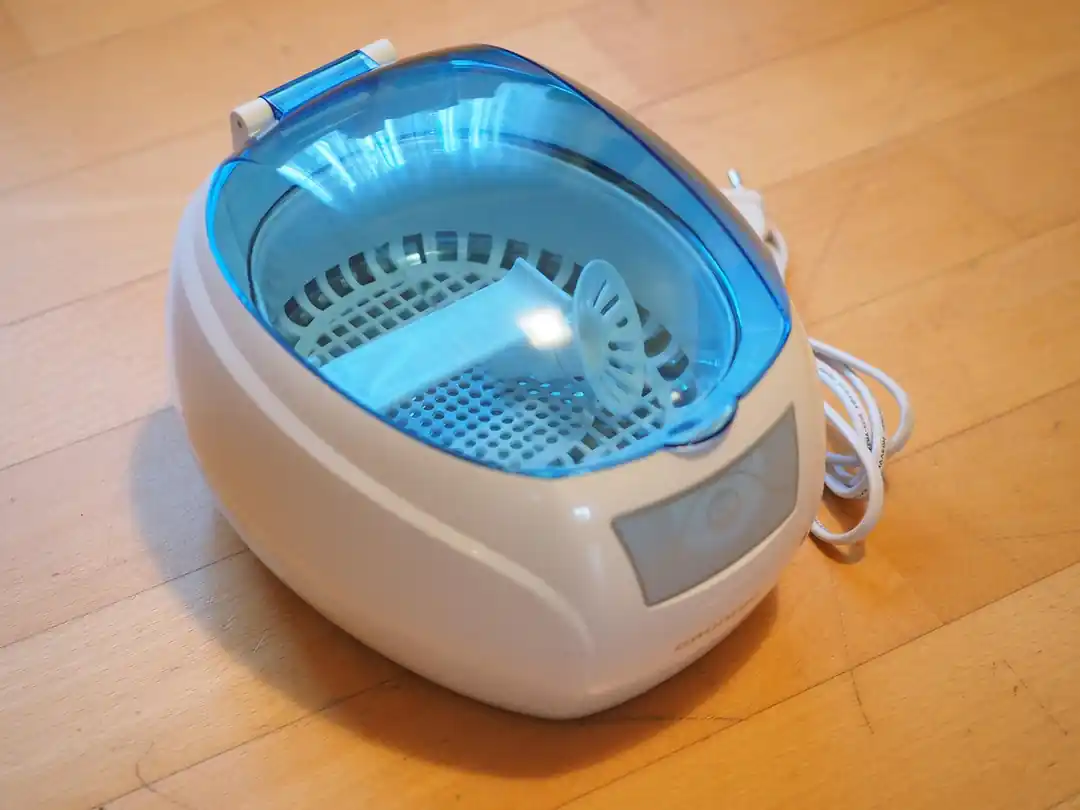
First things first, let's demystify these gadgets. An ultrasonic cleaner isn't just a fancy vibrating tub; it's a marvel of modern cleaning technology. These machines use high-frequency sound waves to create millions of microscopic bubbles in a liquid solution. This process, called cavitation, generates tiny but powerful shockwaves that dislodge dirt, oil, and grime from every single surface of your jewelry—even those impossible-to-reach spots in detailed filigree or chain links.
It's a gentle yet incredibly effective way to clean because it doesn't rely on harsh scrubbing or abrasive chemicals. This non-abrasive action is precisely why ultrasonic cleaners are so popular for delicate items. They excel at lifting away the daily buildup of body oils, sweat, lotions, and dust, leaving your pieces looking remarkably refreshed. Honestly, watching the water turn cloudy after a cleaning cycle is both a little gross and incredibly satisfying—it's visible proof that it's really working! However, it's crucial to understand that an ultrasonic cleaner is a mechanical cleaner, and that distinction is vital when it comes to silver.
Tarnish Troubles: What Ultrasonic Cleaners Can (and Can't) Do for Silver
Here's where many people, myself included, initially get a bit confused. When you think of "cleaning" silver, you're probably thinking of removing that unsightly black or yellowish tarnish. While an ultrasonic cleaner will certainly make your silver look cleaner by removing surface dirt, it will not remove tarnish on its own. Tarnish isn't just dirt; it's a chemical reaction—a thin layer of corrosion (silver sulfide) that forms when silver reacts with sulfur in the air.
Because tarnish is chemically bonded to the metal, the cavitation bubbles alone aren't enough to break it down. If you put a heavily tarnished silver piece into an ultrasonic cleaner with just water, it will come out free of grime, but the tarnish will likely remain. I learned this the hard way with a beloved antique locket; it looked brighter, yes, but that stubborn dark patina was still there. To tackle tarnish, you need to pair your ultrasonic cleaner with a specialized silver cleaning solution or a chemical dip designed for that purpose. The machine provides the muscle, but the solution provides the chemical reaction needed to dissolve the tarnish.
The Delicate Dance: When NOT to Use an Ultrasonic Cleaner on Silver
This is perhaps the most critical part. While solid sterling silver is generally safe, there are several instances where you should absolutely avoid using an ultrasonic cleaner. The intense vibrations can cause serious, irreversible damage to certain types of jewelry.
First and foremost: gemstones. Soft or porous stones are extremely vulnerable. This includes emeralds, opals, pearls, turquoise, amber, coral, and lapis lazuli. The vibrations can cause them to crack, fracture, or discolor. The same goes for any stone that has been treated to enhance its color or clarity, as the machine can strip away these treatments. Even hard stones like diamonds should be inspected first; if a setting is even slightly loose, the vibrations can easily shake the stone out.
Second, avoid cleaning plated silver jewelry. The ultrasonic waves can be too aggressive for the thin layer of plating, causing it to chip, flake, or wear away, leaving you with a patchy, unattractive finish. If your piece isn't solid sterling silver, it's best to stick to a soft polishing cloth.
Finally, be very cautious with antique or intentionally oxidized silver. Many antique pieces derive their charm and value from their natural patina. Similarly, some modern jewelry is intentionally oxidized to create dark accents and highlight details. An ultrasonic cleaner, especially with a tarnish-removing solution, can strip away this finish, destroying the character and diminishing the value of the piece.
Best Practices for a Brilliant Shine
If you've determined your silver jewelry is a good candidate for ultrasonic cleaning, following a few best practices will ensure the best results.
-
Choose the Right Solution: Use a cleaning solution specifically formulated for silver and for use in ultrasonic cleaners. If you prefer a DIY route, a few drops of mild, pH-neutral dish soap in warm distilled water is a safe bet. Avoid using tap water, as its minerals can leave spots.
-
Don't Overcrowd: Place your pieces in the basket so they are not touching each other. This prevents them from scratching one another during the cleaning cycle.
-
Keep it Short: For most silver, a cleaning cycle of 2-5 minutes is more than enough. Running it for too long, especially with sterling silver, can sometimes lead to a "frosty" or pitted appearance. It's better to run a couple of short cycles than one long one.
-
Rinse and Dry Thoroughly: After the cycle is complete, rinse your jewelry under clean, lukewarm water to remove any remaining solution. Then, immediately dry it with a soft, lint-free cloth to prevent water spots and bring out the shine.
An ultrasonic cleaner can be a fantastic tool in your jewelry care arsenal, but it's not a one-size-fits-all solution. By understanding its capabilities and its limitations, you can avoid costly mistakes and keep your silver looking its absolute best. It’s about pairing modern technology with a little bit of old-fashioned know-how to preserve the beauty and integrity of the pieces you love.
You might also like

Beyond the Burn: Your Ultimate Guide to a Sun-Safe Beach Holiday
Heading to the coast? Let's move past the basic advice and dive deep into what it really takes to protect your skin, so you can enjoy every single sun-drenched moment, worry-free.

Stay in the Game: The Unsung Exercises That Prevent Football's Most Common Injuries
It’s not just about how hard you play, but how smart you prepare. Let's move beyond the highlight reels and talk about the foundational work that keeps you on the field, week after week.

The Anatomy of Cool: Key Elements of 1960s Mod Fashion
Forget everything you thought you knew about fashion. We're diving deep into the 1960s Mod movement, a youth-driven revolution that redefined style with sharp lines, bold colors, and an attitude to match.

Beyond the Music: A Walker's Guide to Liverpool's Historical Heart
Forget what you think you know. Liverpool's story is etched in stone and sea, and I'm taking you on a journey to discover its most profound historical sites.
Don't Get Lowballed: Key Tactics for Negotiating with Insurance After a Car Accident
That first call from the insurance adjuster can be intimidating. But with the right strategy, you can navigate the negotiation and secure a fair settlement. Here’s how to prepare.