Forget the White Dot: How to Actually Photograph the Full Moon With Your Smartphone
Tired of taking disappointing, blurry photos of the moon? It’s not your phone, it’s your technique. Here’s how to get stunning lunar shots with the camera in your pocket.
There’s something that feels almost primal about seeing a full moon hanging heavy in the night sky. It’s beautiful, a little mysterious, and it makes almost all of us do the exact same thing: pull out our phones. We point, we tap, and we’re almost always met with the same disappointing result—a photo of a bright, blurry, featureless dot that looks more like a streetlight than the majestic celestial body we were just admiring. I know the feeling all too well. For years, my camera roll was a graveyard of sad, white blobs.
I used to believe the conventional wisdom that you just can't get a good picture of the moon without a "real" camera. You know, the kind with a lens that looks like a telescope and a price tag to match. But the cameras in our pockets are computational photography powerhouses, and with a little bit of know-how, you can absolutely bend them to your will. The problem isn't the phone; it's that the automatic settings are completely baffled by the scene. They see one incredibly bright object in a sea of total darkness and have a digital meltdown trying to expose for both.
The secret isn't buying more gear (though one cheap accessory helps immensely). It's about taking control back from the automatic mode and telling your phone exactly what you want it to do. It’s about understanding a few core principles of photography and applying them in a smart way. So, let's finally put an end to the era of the white dot. In this guide, I’ll walk you through the simple, practical steps to start taking lunar photos that you’ll actually want to share.
Your Foundation: Stability is Everything
Before we even touch a single setting on your phone, we have to address the number one killer of sharp moon photos: movement. When you're trying to capture a subject that's nearly 240,000 miles away, even the microscopic tremor from your own heartbeat can turn a detailed crater into a soft blur. This is especially true if you're using any amount of zoom, which magnifies not only the moon but also every tiny shake of your hand.
This is where a tripod becomes your most valuable tool. And no, you don't need a heavy, professional one. A small, lightweight smartphone tripod is more than enough to do the job. You can find them online for less than the price of a few fancy coffees. The goal is simply to provide a completely stable platform for your phone, eliminating that hand-shake variable from the equation. A flexible one, like a GorillaPod, is even better, as it can wrap around railings or branches for more creative positioning.
Once your phone is mounted, don't sabotage your efforts by tapping the on-screen shutter button. The very act of touching the screen can introduce a slight wobble at the critical moment. Instead, use the camera's built-in self-timer. Setting it to a 2 or 3-second delay gives the phone enough time to stop vibrating after you've touched it. Even better, use a cheap Bluetooth remote shutter or the volume button on your wired headphones if your phone supports it. It might feel like a small thing, but this hands-off approach is the bedrock of a truly sharp shot.
Go Pro: Unlocking Manual Mode
Your phone’s automatic camera mode is a genius for most situations, but photographing the moon is its kryptonite. To get the shot, you have to break up with "Auto" and get friendly with "Pro" or "Manual" mode. Most modern smartphones have this built into their native camera app, but if yours doesn't, there are amazing third-party apps like Halide (iPhone) or ProCam X (Android) that give you the control you need.
First, let's tackle ISO. This setting controls your camera sensor's sensitivity to light. For a bright subject like the moon, you want the lowest possible ISO, usually 50 or 100. A low ISO means less digital noise and a cleaner, crisper image. Since the moon is basically being lit by the sun, it's incredibly bright, so you don't need a high ISO to capture it.
Next up is shutter speed, which determines how long the sensor is exposed to light. This is where you'll do most of your fine-tuning. A good starting point is around 1/250s. If your image looks like a blown-out white circle, you need a faster shutter speed (like 1/500s or 1/1000s) to let in less light. If it's too dark, try a slightly slower speed (like 1/125s). Take a test shot, zoom in to check the detail, and adjust until you find that sweet spot where you can clearly see the texture of the lunar surface.
Finally, nail your focus. Autofocus will almost certainly struggle here. Tap on the moon on your screen to set your focus point, and then, if you can, lock it. In Pro mode, you'll see a focus slider. Slide it all the way to the "infinity" setting (often marked with a mountain icon). This tells the lens to focus as far away as possible, which is exactly what you need for an object in space.

The Art of the Shot: Zoom and Composition
Here’s a hard truth: digital zoom is not your friend. It’s incredibly tempting to pinch-to-zoom as far as you can, but all you're doing is cropping the image and throwing away pixels. This results in a grainy, low-quality photo. Instead, rely on your phone's optical zoom. If your phone has multiple lenses (e.g., 1x, 3x, 5x), tap the highest optical zoom number available. This uses real glass to magnify the image, preserving quality. Take the shot with optical zoom, and then crop it later in an editing app to get a tighter frame.
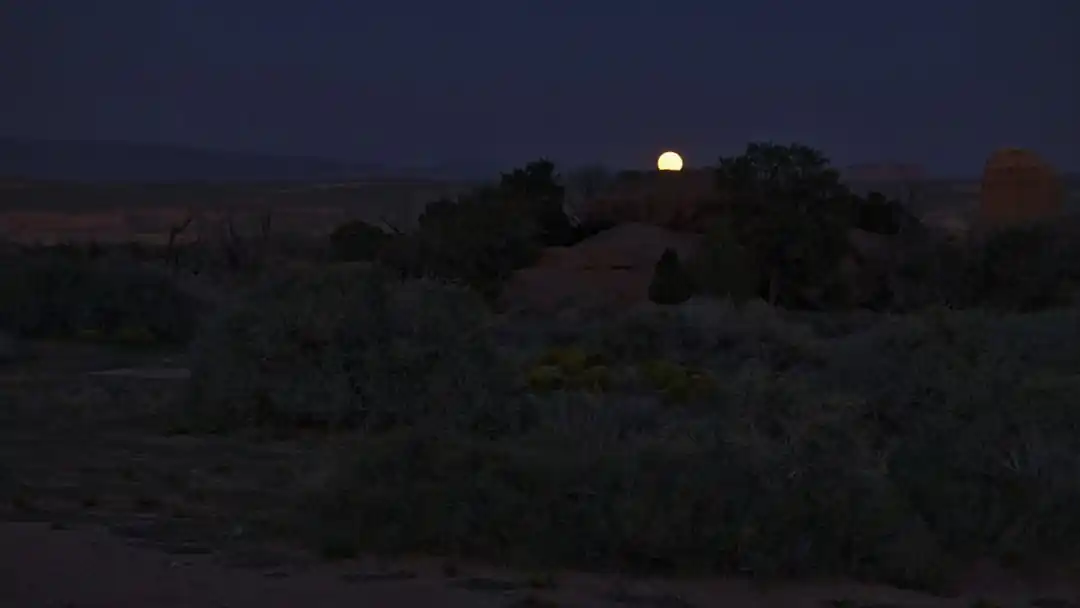
While a close-up of the moon can be stunning, often the most compelling photos are those that include a sense of place. A photo of just the moon in a black sky lacks context. Try to frame your shot to include something in the foreground—the silhouette of a tree, a distant mountain range, or the city skyline. This not only makes the composition more interesting but also gives the viewer a sense of scale, making the moon feel more grand and integrated into the landscape.
To plan these kinds of shots, apps like PhotoPills or The Photographer's Ephemeris are invaluable. They can show you exactly where the moon will rise and set on any given day, allowing you to line up your shot with a specific landmark. It takes a bit of planning, but the payoff is a photo that tells a story, rather than just documenting an object. Think about the time of your shot, too. The "blue hour," that magical time just after sunset when the sky is a deep, rich blue instead of pure black, can provide a beautiful backdrop for the rising moon.
Finishing Touches: The Power of a Good Edit
Shooting in your camera's Pro mode often gives you the option to save the photo as a RAW file (it might be a .DNG file). Always choose this if you can. A standard JPEG is compressed and processed by your phone, which discards a lot of image data. A RAW file is like a digital negative; it contains all the original, unprocessed data from the sensor, giving you far more flexibility in editing.
Bring your RAW file into a free editing app like Snapseed or Adobe Lightroom Mobile. Here, you can make subtle adjustments that have a huge impact. Start by slightly lowering the highlights, which will bring back detail in the brightest parts of the moon's surface. You can then gently lift the shadows to reveal a bit of detail in the landscape or sky without making it look unnatural.
Finally, add a touch of sharpening or texture. This can really make the craters and seas of the moon pop. The key is to be gentle. The goal is to enhance the detail that's already there, not to create something artificial. A little bit of editing can take a good shot and make it truly great, transforming it from a simple photo into a work of art. With these techniques in your back pocket, you're no longer just a hopeful snapper; you're a lunar photographer, ready to do that beautiful full moon justice.
You might also like
Whistler Without the Hike: Your Ultimate Summer Guide
Think Whistler in the summer is just for hikers? Think again! Discover a world of adventure, relaxation, and culinary delights that don't require a single pair of hiking boots. From breathtaking gondola rides to serene spa days, here's how to enjoy the best of Whistler, no strenuous activity required.

A Savvy Traveler’s Guide to Currency and Cards in Senegal
Heading to Senegal? Let's break down everything you need to know about money—from exchanging currency to using your credit cards—so you can travel with confidence.

The Solo Traveler’s Guide to Safety: How to Explore with Confidence
Thinking about traveling alone? It’s one of the most rewarding experiences you can have. Here are the essential, real-world safety tips to make sure your journey is as secure as it is unforgettable.
The Ultimate Guide to Renting a Car and Driving in Morocco
Thinking of a Moroccan road trip? It’s an incredible way to see the country. Here’s everything you need to know about renting a car, navigating the roads, and what to do at those police checkpoints.

Your Guide to a Genuinely Stress-Free Christmas Eve Dinner
Tired of the holiday hosting frenzy? It’s time to trade the panic for presence. Here’s how to host a Christmas Eve dinner that’s as joyful for you as it is for your guests.